Tuesday, October 18, 2022

Solarflare TCPDirect

 Copied from 

https://blog.emumba.com/a-beginners-guide-to-solarflare-tcpdirect-1c590759d18c


A beginner’s guide to Solarflare TCPDirect

For the past few months, our team has been working on reducing the overall latency of the TCP/IP stack. Solarflare’s OpenOnload based kernel bypass gives a significant performance boost over the kernel. Using that, we were able to achieve 1800ns UDP to TCP round trip with our application in it but this wasn’t enough. After some research, we found out that TCPDirect claims a further performance boost of around 300–350ns, so we decided to test it out. Although there is a manual available for TCPDirect, there isn’t any significant, easy to understand help available to port conventional sockets to TCPdirect “zockets”.

After a lot of exploration and experimentation, I have come out to a cheat sheet to convert a conventional socket-based application to TCPDirect’s “zockets”.

Initial Setup

Initial Setup

To get started with TCPDirect, you have to do the following initializations

  1. Add the required libraries.
  2. Call zf_init(). It initializes the TCPDirect.
  3. Set the optional properties of TCP/IP stack in the “Attr” structure e.g buffer size or interface. This attribute will be used in the next step and later on while initializing the zockets.
  4. Allocate the stack. One stack can handle a maximum of 64 zockets. If you want to open more zockets you have to create more stacks.

Unlike conventional UDP socket, which provides the leverage of sending and receiving UDP packets through the same socket, you must have two different zockets for sending and receiving in TCPDirect.

UDP Receive

UDP Receive

To set up a receive zocket, you need to perform the following steps.

  1. Set up a UDP receive zocket using stack and attribute structures used in the initialization step.
  2. Bind to the address you want to listen, here ai_local is addrinfo type structure.
  3. Call zf_reactor_perform() to check if any packet is received.
  4. Use zfur_zc_recv() to receive the packet, if the packet is available in the previous step.
  5. As it is a zero-copy receive, free the sk-buff after utilizing the data.

UDP Send
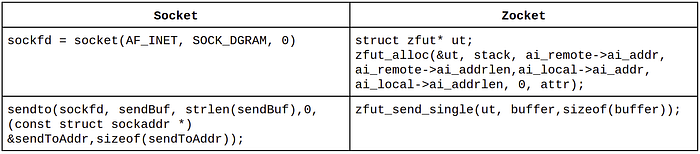
UDP Send

To send a UDP packet, do the following steps

  1. Set up a UDP send zocket using stack and attribute structures used in the initialization step. Give remote and local addresses in ai_local and ai_remote, which are addrinfo type structures.
  2. Send packet using zfut_send_single().

TCP Send Receive

Unlike UDP, the same zocket can be used to send and receive packets.

  1. Set up a TCP zocket using stack and attribute structures used in the initialization step.
  2. Connect to the remote server using zft_connect, here ai_remote is addrinfo type structure.
  3. Send a packet using zft_send_single().
  4. Start listening to the port to receive packets.
  5. Use zftl_accept() to check if a connection is accepted or not.
  6. Frequently call zf-reactor_perform() to check for any received event or packet. This is a very critical function, as it also handles some non-user-visible events like sending the ACK or retransmitting the packet.
  7. Use zft_zc_rect() to receive a packet.
  8. As it is a zero-copy receive, free the sk-buff after utilizing the data.

Final words

TCPDirect APIs are a bit different from the kernel APIs but they can be easily mapped. A small effort in changing them can result in a significant performance boost of about 300–350ns in your latency-critical application. Hopefully, this guide will be helpful to get you started with TCPDirect.


Tuesday, July 5, 2022

Install GCC from source

 Copied from :

https://linuxhostsupport.com/blog/how-to-install-gcc-on-centos-7/


Install GCC from source

If you need a newer version of GCC than the one distributed by the official CentOS 7 repositories you can install it from source.

It is highly recommended to start a screen session before starting the installation. Run the following command

screen -U -S gcc

Download the tarball of the GCC version you want to install. In our example we will use GCC version 7.3.0

wget http://ftp.mirrorservice.org/sites/sourceware.org/pub/gcc/releases/gcc-7.3.0/gcc-7.3.0.tar.gz

Unpack the tar archive and change the current working directory

tar zxf gcc-7.3.0.tar.gz
cd gcc-7.3.0

Install bzip2 and run the ‘download_prerequisites’ script to download some prerequisites needed by GCC. You have to run this from the top level of the GCC source tree.

yum -y install bzip2
./contrib/download_prerequisites

Once the prerequisites are downloaded execute the following command to start configuring the GCC build environment

./configure --disable-multilib --enable-languages=c,c++

Once it is completed, run the following command to compile the source code. It may take a few hours for the compilation to complete, so sit back and relax.

make -j 4
make install


Friday, January 28, 2022

ProtoBuf - VS 2022 - Support

Copied from https://mahmud.blog/2019/07/17/use-visual-studio-to-generate-cs-from-proto-and-steamline-your-development-process/


Use Visual Studio to generate .cs from .proto and steamline your development process

Well, protobuf. Right? If you haven’t heard of it, please visit – https://developers.google.com/protocol-buffers/ and read it. It is pretty cool in terms network communication. Reduces size of your payload a lot.

Now, if you are like me trying to use .proto files with Visual Studio, you might find it painful, to re-generate .cs files after your .proto files are changed. And also make sure you could also right code logic around those .cs classes generated, without any hassle. I kind, came up with a solution to this for my cases. Sharing here, in case anyone else finds it useful.

The Solution

Lets create our solution first. My solution name is ProtobufDemo. I will add few projects (will describe later), and it looks like this –

This is a very simple solution –

  • src contains all the source code
    • ProtobufDemo.Message we will have .proto definition files here. I am a bit lazy and I really don’t going into command line and run a command each time I am modifying something in my definition file. I will use this project to auto generate the cs files from proto file.
    • ProtobufDemo.Message.Generated is the project we will have our generated POCO classes and also any additional logic that we might want to have for the message. For example, validation and adding some on demand fields, etc.

The Example Domain (.proto)

Our domain is a plain and simple blog entry. With 3 fields –

  • Title
  • Content
  • Author

So, it looks like this –

//Blog.proto

syntax = "proto3";
option csharp_namespace = "ProtobufDemo.Message"; // the generated namespace for cs classes

message Blog {
	string title = 1;
	string content = 2;
	string author = 3;
}

The Generated Domain (.cs)

Before we include the tools to generate the .cs classes, we need to fix few things. I have listed them bellow –

  1. I am going to use official grpc.tools to generate the .cs files. More about the grpc tools can be found here https://grpc.io/docs/quickstart/csharp/
  2. By default grpc.tools generates the files inside obj folder in the same project. This causes sometimes troubles for MSbuild system as something the build remnants stays there and causes double reference error.
  3. I am going to use the second project (ProtobufDemo.Message.Generated) to include those generated .cs files. This keeps both the projects and build system clean.

Add Required Tools

Lets add required nuget packages to our project, that will generate the .cs files from .proto files.

Go to project ProfibufDemo.Messages

Add packages –

<package id="Google.Protobuf" version="3.7.0" targetFramework="net47" />
  <package id="Grpc" version="1.20.1" targetFramework="net47" />
  <package id="Grpc.Core" version="1.20.1" targetFramework="net47" />
  <package id="Grpc.Core.Api" version="1.20.1" targetFramework="net47" />
  <package id="Grpc.Tools" version="1.20.1" targetFramework="net47" developmentDependency="true" />
  <package id="protobuf-net" version="2.4.0" targetFramework="net47" />
  <package id="System.Interactive.Async" version="3.2.0" targetFramework="net47" />

That will make sure every time we build project, it will convert any .proto file in this project to .cs .

Now, we need to control how that .cs file is being generated. As I mentioned earlier the default location is obj folder, which is not quite I want.

First, make sure the Build Action for your file is Protobuf. This option only appears after the nuget packages are installed.

You might need to reload the solution to have it enabled after installing the nuget package.

Modify Project file

Unfortunately, there is no shortcut for this. You have to modify the project file for ProtobufDemo.Message project to make sure the files are generated into correct locations. Since I am using the other project (ProfotbufDemo.Message.Generated) for including the .cs file, I will use the location for that project. Please use location that best suites your need.

<?xml version="1.0" encoding="utf-8"?>

 ....
  <ItemGroup>
    <None Include="packages.config" />
    <Protobuf Include="Protos\Blog.proto" CompilesOutput="False" GrpcServices="None" OutputDir="..\ProtobufDemo.Message.Generated\Generated" />
.....

That is right, just the item for the .proto file in this case –

<Protobuf Include="Protos\Blog.proto">

With –

<Protobuf Include="Protos\Blog.proto" CompilesOutput="False" GrpcServices="None" OutputDir="..\ProtobufDemo.Message.Generated\Generated" />

The Protobuf tag supports few more attributes. You can check them all out at grpc tools. https://grpc.io/docs/quickstart/csharp/

This practically says to generate the file to that location. Unfortunately, there is no shortcut to this, but luckily you only have to it once per file.

Now, build and you will see files generated in proper location.

Enable Show All Files from solution explorer, you will be able to see the generated folder/files. Lets include the file into the project –

That is it. Now every time you modify your .proto file, you will have your .cs auto generated and updated. No more extra works or commands to run.

Adding Custom Property to Generated POCO

Well, that solves half the problem. The other half is what if I Want to add some custom logic for the class or some custom validation or some custom read-only property to keep a clean implementation.

You are lucky, cause the POCO classes generated by grpc tools are partial. All you have to do is match the namepace and classname and you can have a very simple interface implementation and logic to inject with. I will not go into details, but a typical web framework with command handlers and controllers look like this –

The proto

syntax = "proto3";
option csharp_namespace = "ProtobufDemo.Message"; //match it in partial class

message Blog {
	string title = 1;
	string content = 2;
	string author = 3;
}

The Interface

namespace ProtobufDemo.Message
{
	public interface IDomain
	{
		bool HasTitle();
	}
}

The Custom Class


namespace ProtobufDemo.Message
{
	public partial class Blog : IDomain
	{
		public bool HasTitle()
		{
			return string.IsNullOrWhiteSpace(Title); //perfect use of shared property in partial class
		}
	}
}

The structure might look like this-

I hope this helps to keep things simple.


Monday, January 10, 2022

Adding custom monitors to zabbix

 Copied from 

https://programmer.ink/think/adding-custom-monitors-to-zabbix.html

Adding custom monitors to zabbix

Posted by lawnninja on Thu, 29 Aug 2019 14:14:58 +0200

Adding custom monitors to zabbix

By writing scripts to obtain various states of tcp, adding TCP status template, triggers, graphics, the whole process of customizing monitoring through scripts is realized.

1. agent-side configuration

1. Create custom scripts to store directories

[root@localhost ~]# mkdir /etc/zabbix/scripts
[root@localhost ~]# chown zabbix.zabbix /etc/zabbix/scripts/

2. Create scripts

Create a script to get the tcp status, as shown below

#!/bin/bash
#this script is used to get tcp and udp connetion status
#tcp status
metric=$1
tmp_file=/tmp/tcp_status.txt
/bin/netstat -an|awk '/^tcp/{++S[$NF]}END{for(a in S) print a,S[a]}' > $tmp_file

case $metric in
  closed)
         output=$(awk '/CLOSED/{print $2}' $tmp_file)
         if [ "$output" == "" ];then
            echo 0
         else
            echo $output
         fi
       ;;
  listen)
         output=$(awk '/LISTEN/{print $2}' $tmp_file)
         if [ "$output" == "" ];then
            echo 0
         else
            echo $output
         fi
       ;;
  synrecv)
         output=$(awk '/SYN_RECV/{print $2}' $tmp_file)
         if [ "$output" == "" ];then
            echo 0
         else
            echo $output
         fi
       ;;
  synsent)
         output=$(awk '/SYN_SENT/{print $2}' $tmp_file)
         if [ "$output" == "" ];then
            echo 0
         else
            echo $output
         fi
       ;;
  established)
         output=$(awk '/ESTABLISHED/{print $2}' $tmp_file)
         if [ "$output" == "" ];then
            echo 0
         else
            echo $output
         fi
       ;;
  timewait)
         output=$(awk '/TIME_WAIT/{print $2}' $tmp_file)
         if [ "$output" == "" ];then
            echo 0
         else
            echo $output
         fi
       ;;
  closing)
         output=$(awk '/CLOSING/{print $2}' $tmp_file)
         if [ "$output" == "" ];then
            echo 0
         else
            echo $output
         fi
       ;;
  closewait)
         output=$(awk '/CLOSE_WAIT/{print $2}' $tmp_file)
         if [ "$output" == "" ];then
            echo 0
         else
            echo $output
         fi
       ;;
  lastack)
         output=$(awk '/LAST_ACK/{print $2}' $tmp_file)
         if [ "$output" == "" ];then
            echo 0
         else
            echo $output
         fi
        ;;
  finwait1)
         output=$(awk '/FIN_WAIT1/{print $2}' $tmp_file)
         if [ "$output" == "" ];then
            echo 0
         else
            echo $output
         fi
        ;;
  finwait2)
         output=$(awk '/FIN_WAIT2/{print $2}' $tmp_file)
         if [ "$output" == "" ];then
            echo 0
         else
            echo $output
         fi
        ;;
        *)
         echo -e "\e[033mUsage: sh  $0 [closed|closing|closewait|synrecv|synsent|finwait1|finwait2|listen|established|lastack|timewait]\e[0m"
esac

3. Configure zabbix_agent d.conf

To execute a custom script to get data, you need to open the appropriate options in the configuration file. If you have started, you can skip this step.

[root@localhost ~]# egrep -v "(^#|^$)" /etc/zabbix/zabbix_agentd.conf
PidFile=/var/run/zabbix/zabbix_agentd.pid
LogFile=/var/log/zabbix/zabbix_agentd.log
LogFileSize=1
EnableRemoteCommands=1  #Allow remote commands to be executed locally
Server=c2600217k6.wicp.vip
ListenPort=10050
ListenIP=0.0.0.0
StartAgents=3
Hostname=47.96.226.49
UnsafeUserParameters=1 #Enable user-defined monitoring scripts
Include=/etc/zabbix/zabbix_agentd.d/*.conf
Timeout=8

4. Custom key profile

[root@localhost ~]# cat /etc/zabbix/zabbix_agentd.d/tcp-status-params.conf 
UserParameter=tcp.status[*],/etc/zabbix/scripts/tcp_conn_status.sh $1

Note: The tcp.status here is the monitored item name, followed by $1 is the corresponding parameter.
For example, the state of closewait is tcp.status[closewait]

5. Restart service

[root@localhost ~]# systemctl restart zabbix-agent.service

6. Testing

Test whether you can get customized monitoring data by zabbix_get on the server side
[root@localhost ~]# zabbix_get -s ip -p 10050 -k "tcp.status[listen]"
13

[root@localhost ~]# zabbix_get -s ip -p 10050 -k "tcp.status[listen]"
13

No problem with data
Note: This command is executed on the server side of zabbix, not on the agent side.
If there is no zabbix_get command, install zabbix_get

[root@localhost ~]# yum -y install  zabbix-get
 Loaded plug-in: fastest mirror
Loading mirror speeds from cached hostfile
 * base: mirrors.aliyun.com
 * epel: mirrors.aliyun.com
 * extras: mirrors.aliyun.com
 * updates: mirrors.aliyun.com
 The package zabbix-get-4.0.12-1.el7.x86_64 is installed and is the latest version without any processing.

Defining custom templates

After the agent side configuration is completed, we need to create the corresponding template on the zabbix server web. Other hosts can apply the template to obtain custom data.

1. Creating Templates

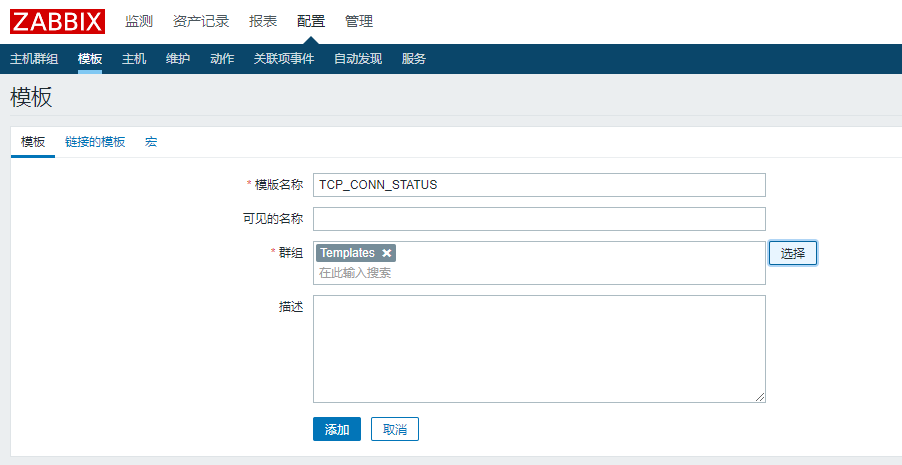
Create a new template in Configuration -> Template ->.
The template name "TCP_CONN_STATUS" group is placed in Templates, and the configuration is shown below.

2. Create monitoring items

After creating the template, we should create the application set first, but when creating the monitor item, we can create the application set directly, so we skip the creation of the application set.
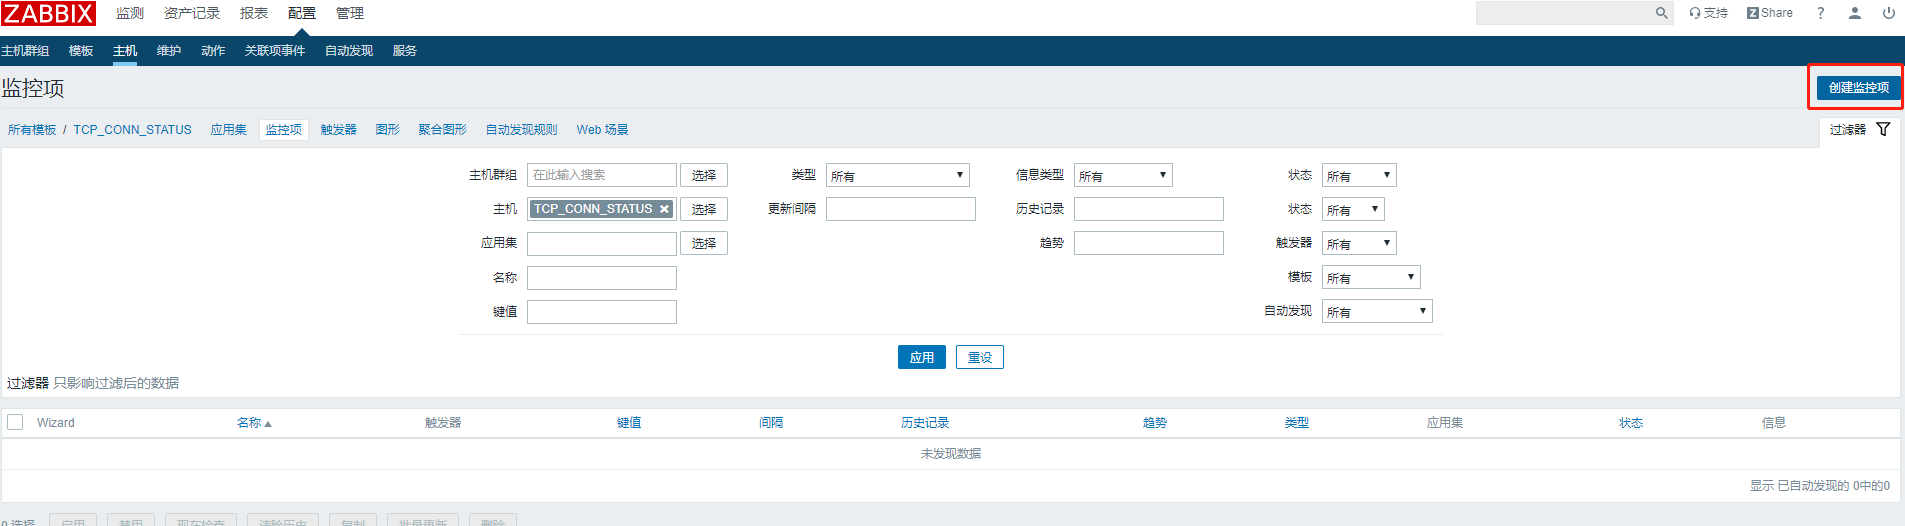
Find the newly created template in Configuration -> Template -> TCP_CONN_STATUS -> Monitor Item -> Create Monitor Item

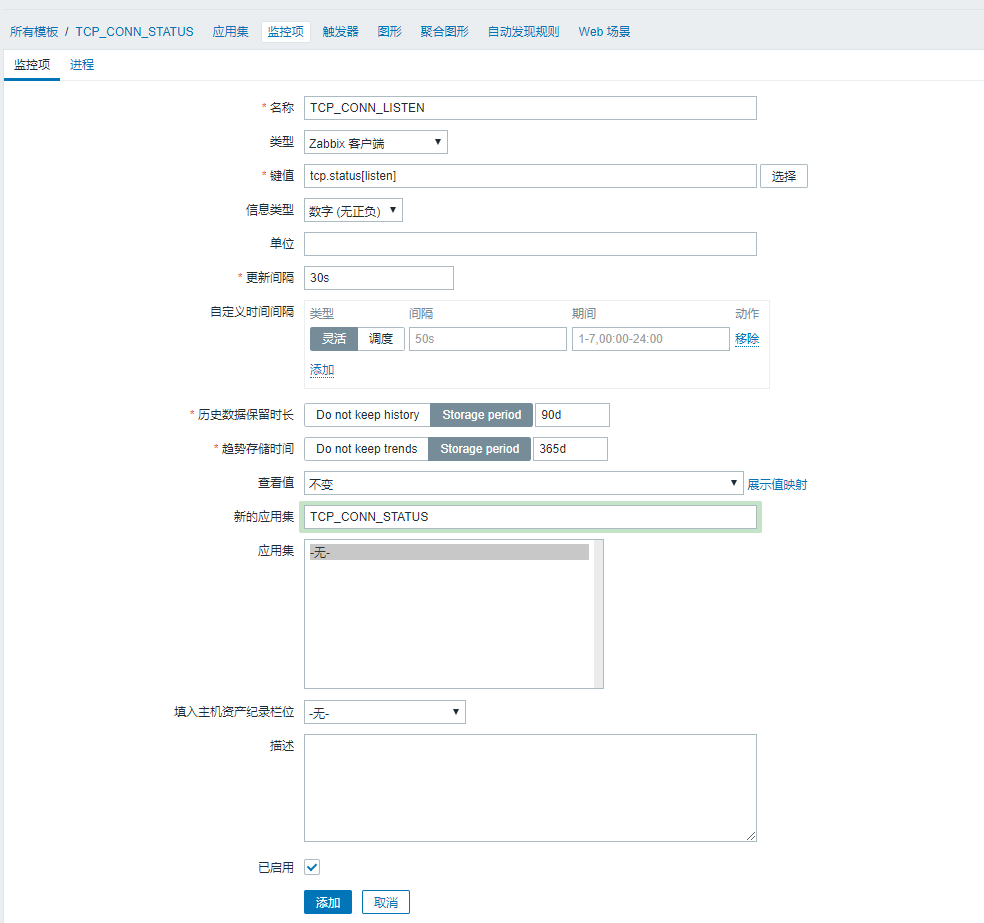
In the monitor item, we define the name TCP_CONN_LISTEN to monitor the number of LISTENs in tcp. The key value is tcp.status[listen] defined in our custom key, and then select the new application set TCP_CONN_STATUS at the application set. Click Add, as shown in the following figure:

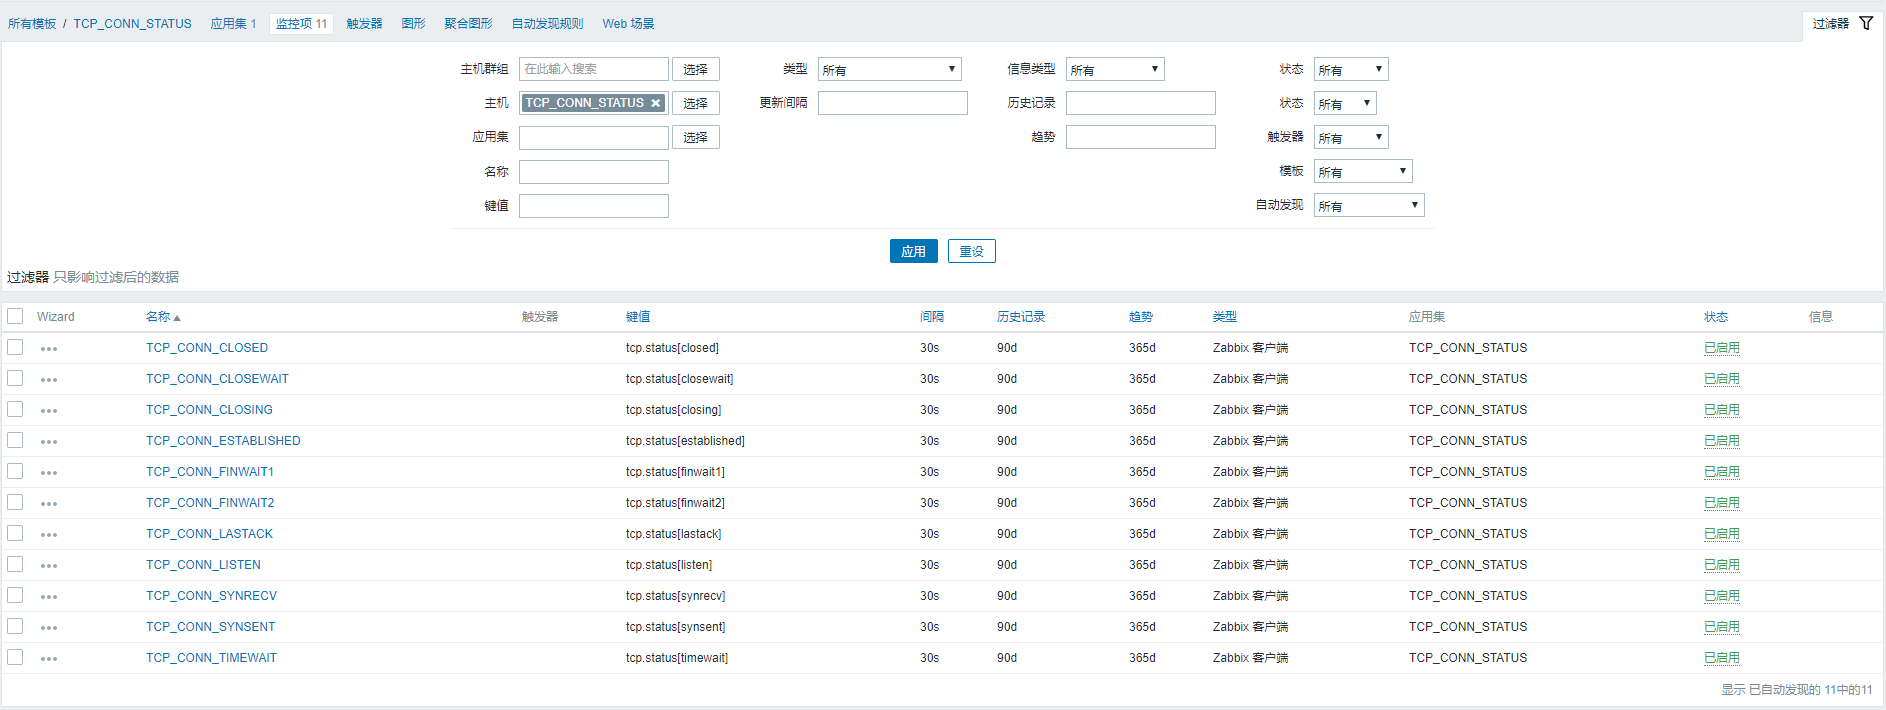
Create other tcp states such as TCP_CONN_CLOSED, TCP_CONN_FIN-WAIT-1, TCP_CONN_LAST-ACK, TCP_CONN_SYN-RECV, TCP_CONN_TIME-WAIT and so on by the above steps.
The final monitoring items are shown in the following figure:

3. Create triggers

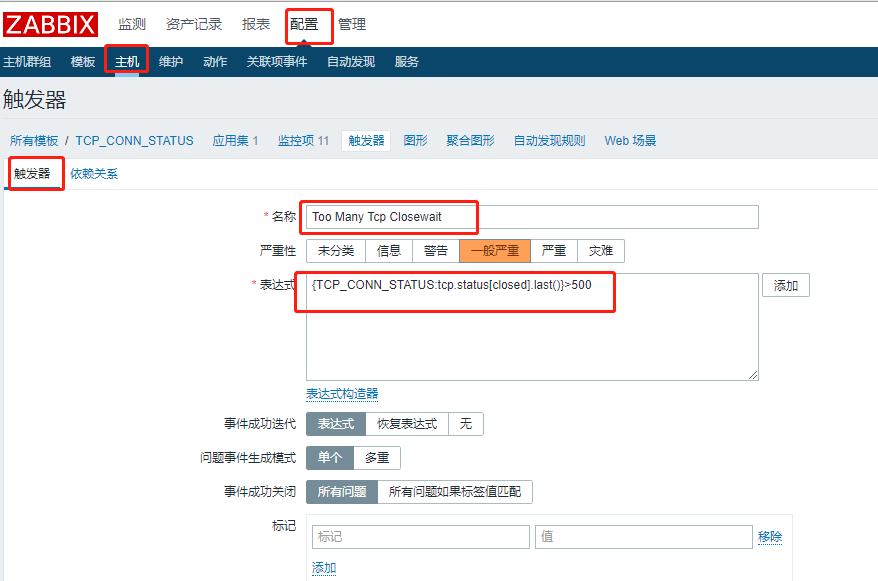
Find the newly created template in Configuration -> Template -> TCP_CONN_STATUS -> Trigger -> Create Trigger, as shown in the following figure:

Create a trigger named Too Many Tcp Closewait, set the number of closewaits to alarm, I set it to 500, the expression is {TCP_CONN_STATUS: tcp. status [closed]. last ()}> 500, the specific configuration is as follows:

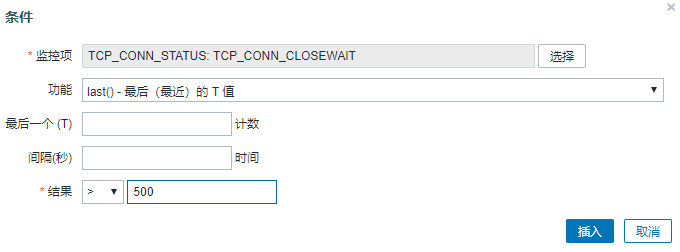
The expression is added at that point. In the monitor item, select the close wait monitor item and insert the result with > 500 clicks, as shown in the following figure:

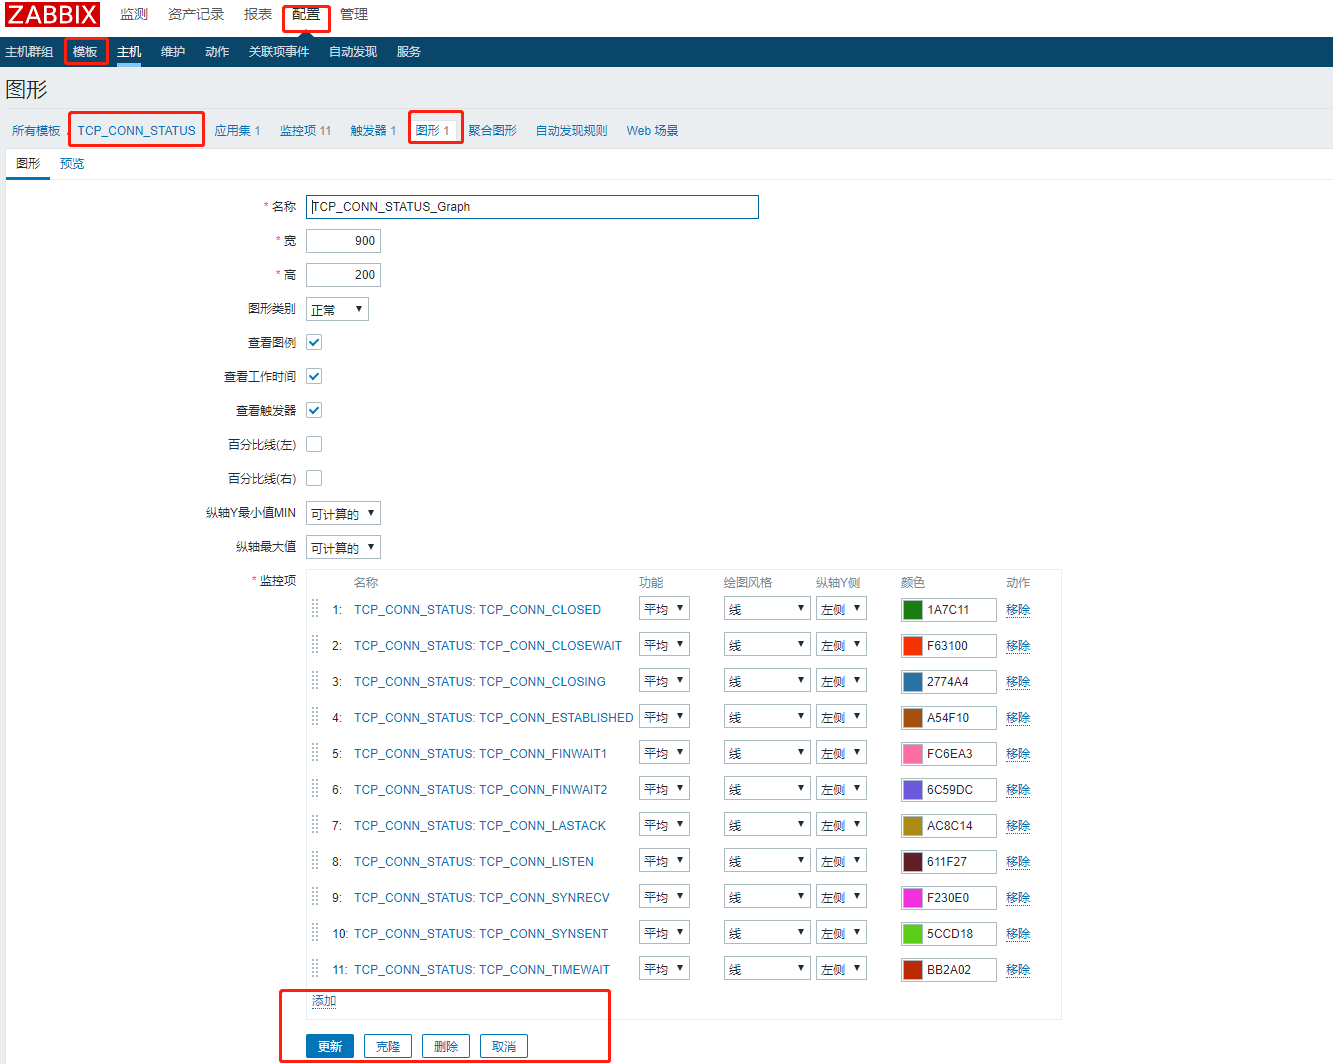
4. Creating Graphics

Configuration -> Module -> TCP_CONN_STATUS - > Graphics - > Create Graphics - > Name "TCP_CONN_STATUS_Graph" - > Select Pre-monitor - > Add as follows:

To complete a custom monitoring template definition here

5. Associated Host

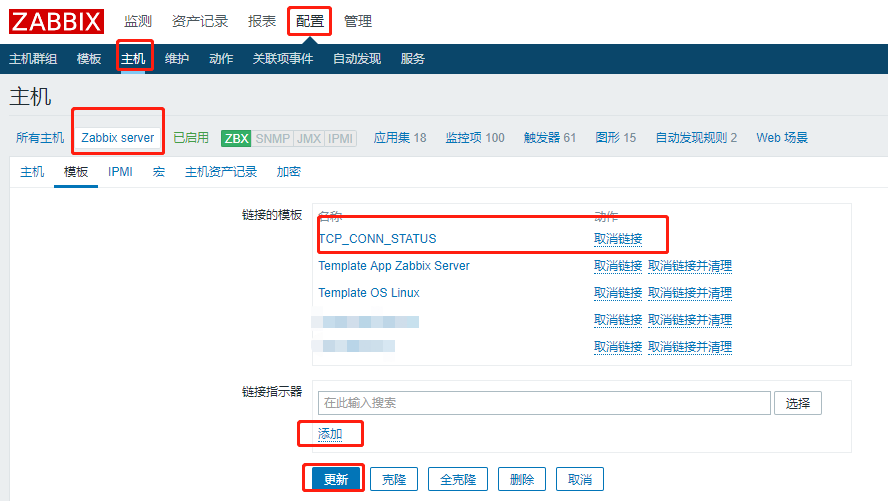
Connect the template we just created to our host for the template to take effect
In Configuration -> Host -> Select the Host to Monitor -> Click Template -> Select the Template we just created on the Link Indicator, click Add -> Click Update, and the Template is added, as shown in the following figure:

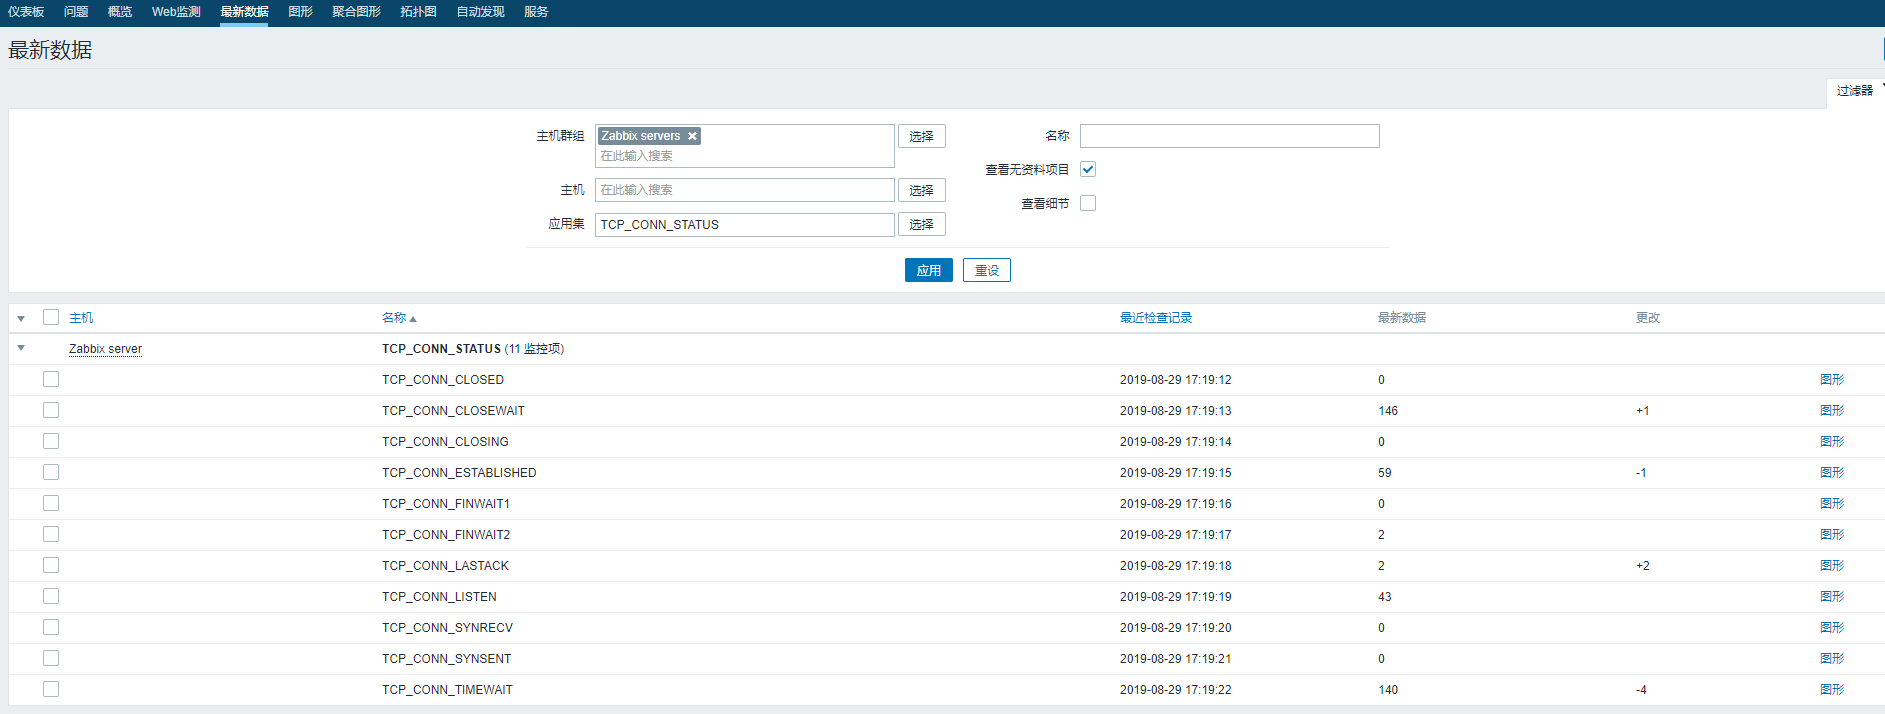
We can see the latest data generation in Detect -> Latest Data -> Select the host that just added the template -> Select the Application Set (TCP_CONN_STATUS), which shows that our template configuration is successful, as shown in the following figure:

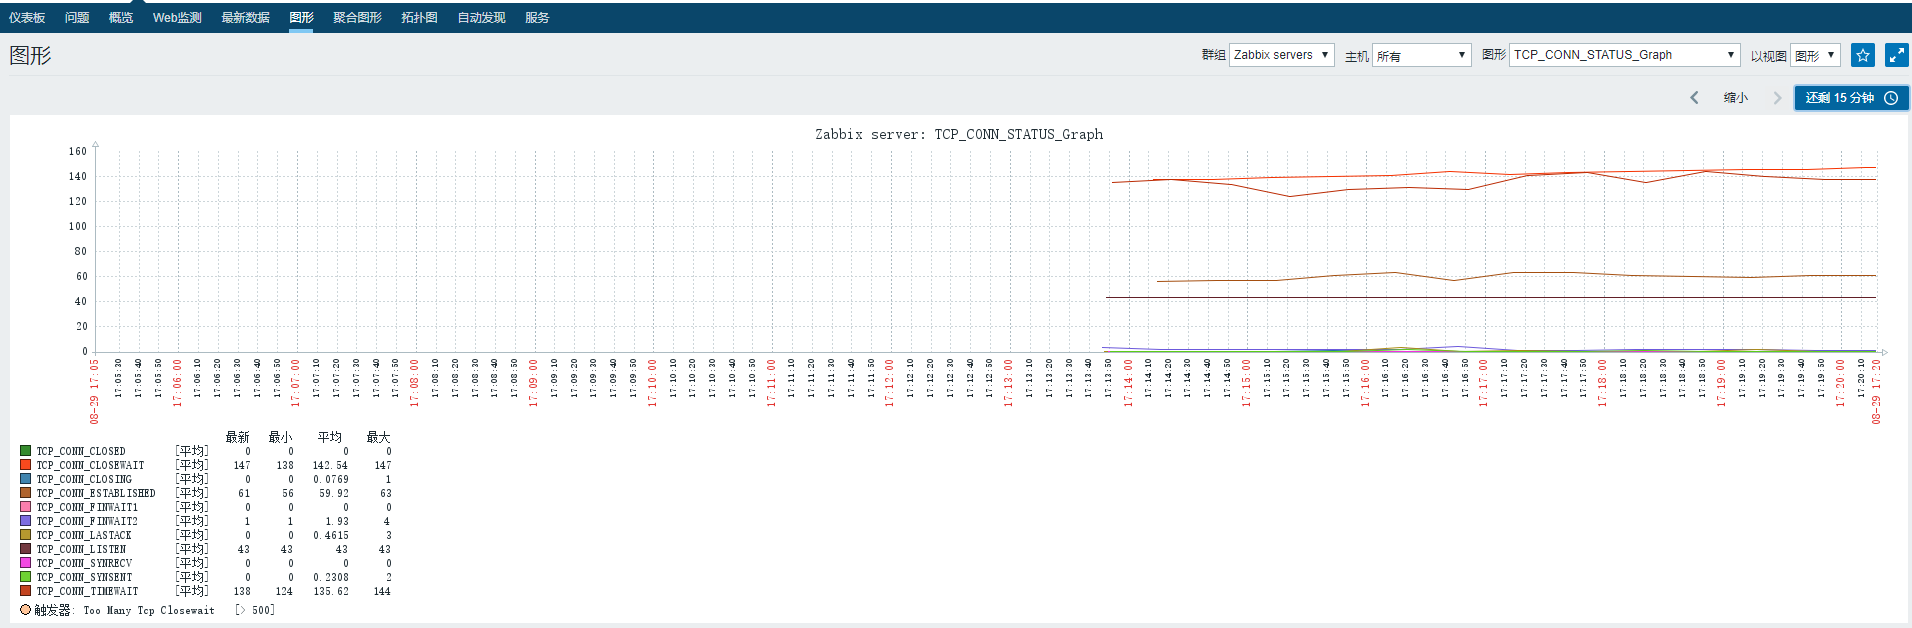
You can also select TCP_CONN_STATUS_Graph we created earlier in the graph to see the graph generation, as shown in the following figure:

Little knowledge:
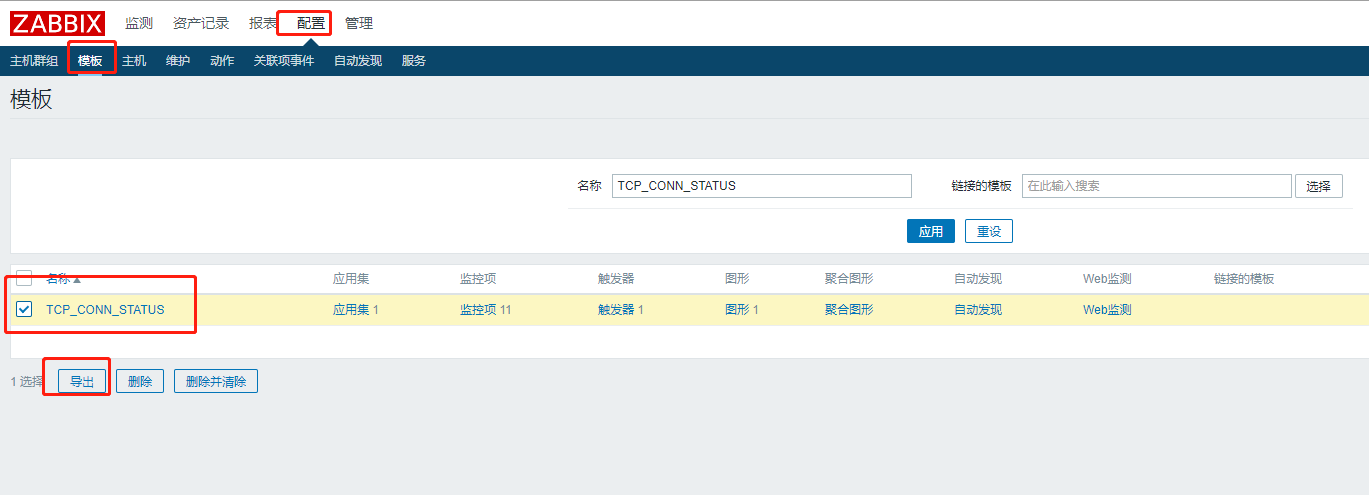
After we have created the template, we can choose to export the template to facilitate our sharing and reuse.
In Configuration -> Template -> Find the Template we created -> Check Template -> Click Export
Save the exported files and use them on other hosts. Note that the template and agent configurations should be consistent.

Topics: Zabbix yum EPEL

Sunday, February 21, 2021

Zabbix Network Monitor

 Follow instructions here

https://www.fosslinux.com/7705/how-to-install-and-configure-zabbix-on-centos-7.htm


 Remember to install  zabbix-web. Otherwise web page will not be loaded.


Remove mysql all installed packages  and install mariaDB 


Fix for charset issue of Database

https://www.zabbix.com/documentation/current/manual/appendix/install/db_charset_coll 


How to setup a host

https://www.youtube.com/watch?v=_qU7ng9m6ms


How to setup Email

https://techexpert.tips/zabbix/zabbix-email-notification-setup/


How to integrate  PagerDuty for mobil notificarions

https://www.pagerduty.com/docs/guides/zabbix-3-integration-guide/

Tuesday, September 29, 2020

Compile Trading System with C++17

 Library versions


gcc version 8.3.1 20191121 (Red Hat 8.3.1-5) (GCC) 

boost_1_74_0

glog-0.4.0

libprotoc 3.13.0  (proto buffer)

NO ZeroMQ


Compile errors fixes

getopt_pp.h -> comment all throw(GetOptEx)

SyncCircularBuffer.h -> boost::interprocess::scoped_lock

boost bind errors -> boost::placeholders::_1 , boost::placeholders::_2


hash_map errors -> Just replace with std_map and do NOT use unordered_map. string search does not work with unordered_map


Exception errors -> Replace catch(Exception e) with catch catch(IoException &e) [& important]

floor function error -> Add #include <cmath>


Add  LIB += -lrt -lpthread to the Makefile for bellow error

undefined reference to symbol 'shm_unlink@@GLIBC_2.2.5'

undefined reference to symbol 'pthread_mutexattr_settype@@GLIBC_2.2.5'

Saturday, September 19, 2020

libevent

https://libevent.org/

https://github.com/libevent/libevent

 http://blog.gaurav.im/2014/12/15/a-gentle-intro-to-libevent/?fbclid=IwAR0-TS7VZblI959v_dnSSnoFoIFnRuPCso6s-clDJF-RI6UHAGbsZfcneGs

How to install

./configure

make

make install

 How to compile

g++ filename.cpp -levent -levent_core


if this error comes when running "error while loading shared libraries: libevent-2.1.so.7: cannot open "shared object file: No such file or directory

 sudo ln -s /usr/local/lib/libevent-2.1.so.7.0.1  /usr/local/lib/libevent-2.1.so.7